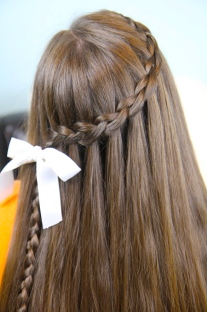
hey, today I am going to show you how to do a waterfall braid. I wore this hair style for my graduation last year and it was really quick and easy to do. It also looked really pretty!
- Brush out your hair and make sure it is straight with no knots.
- Get a chuck of your hair from the from and bring it to the back and split it into three sections.
- Bring the bottom piece of the braid over to the middle and the top piece over to the middle (like you are starting a regular braid).
- Then grab another bit of hair next to were you started the braid and put it in the braid.
- Then bring the piece you added, to the middle piece.
- Hang onto the bottom piece with your pinkie.
- Drop the piece you have on your pinkie.
- Then get another piece to replace it.
- Bring the new piece to the middle piece.
- Repeat this until you get half way around your head and then in it with a bobby pin.
- Then braid the strand all the way to the bottom.
- Feel free to add a ribbon or you can even curl your hair from the bottom.
And then you are done! Enjoy! 😀

This is nice! thanks for sharing!